When an engine is at rest, the oil pan gathers the oil as it flows down from the sides of the crankcase. The plug is then screwed back into the drain hole after the used oil is drained out. Hyundai and Kia have made news in recent months for recalls related to possible engine fires, and now, the sister automakers have two new recalls to announce along those lines.
When it comes to healthy eating, nothing can really top clean eating recipes. This is a high-quality direct fit Replacement oil pan at affordable p. When the gaskets are damage oil will leak out of the oil pan , past the gaskets, and out of your engine. The oil pan gasket acts as a seal for the oil pan.
As a result, your engine will lose oil , which can result in catastrophic engine damage.

You can tell if your oil pan is leaking or if the gasket is leaking by paying attention to oil levels. If your car is using a lot more oil than it did before, then a leak is likely. If your engine oil indicator light is on, it may mean that there is a problem there.
However, a sharp impact with a hard surface at high speed can easily cause the oil pan to start leaking. This condition gets worse as the pan deteriorates. Find great deals on eBay for oil pan replacement oil pan replacement. Installation of oil pan gasket replacement. A service manual is a valuable resource when removing the oil pan.
Other parts and brackets might need to be removed first to access the pan and its bolts, the locations of which are illustrated in the manual. If you install the O ring and pickup hodling bolt first its a little easier. Then the pan , the transmission dust cover, crossmember and the install is complete.
DODGE RAM FORUM - Dodge Truck. Oil pan gasket location, diagnosis, removal and repl. I have done this many times,the pan is low. The up front position is going to be damaged. Drain the oil and wait a day, then clean Patch with J-B WELD KWIK.
Wait another day an your ready to replace the oil. If it leaks , You repeat until you cleaned it well enough for the weld to bonwhich is the tricky part. The Replace oil pan is easier on your wallet than replacing the engine that failed due to massive oil leaks or no oil.
An oil leak increases the risk of driving with insufficient oil in the engine, starving oil driven parts. An oil pan gasket replacement in many vehicle models is not a difficult repair. You can replace the gasket at home if you are willing to put a few hours of work on a Saturday morning, for example.
This guide shows you the process and the key points you need to pay attention to. We know our parts and products. While a new oil pan will usually cost around $1to $20 it is certainly a lot cheaper than replacing an engine that fails to due to massive oil leaks and no oil. So, here is a step by step guide to help you replace the oil pan in your vehicle. The gasket prevents motor oil from leaking out as it travels from the pan to the motor and returns to the pan.
In the majority of modern engines, two style of gaskets are prevalent - liquid gaskets and formed rubber gaskets. However, it usually a much better idea to simply replace the cracked oil pan. On average, an oil pan replacement is going to cost anywhere from $3to as much as $5at a local mechanic. Run the engine for a minute. Position vehicle safely on ramps or jack stands (level surface with rear wheels chalked).
Remove the oil fill cap on the engine. Oil Pan Gasket Replacement. Completely drain the dirty oil into the drain pan. Our Dodge oil pan selection encompasses a broad range of years and models, and the odds are in your favor that we have just the right one for your particular vehicle.
Start the engine and let your car run for a few minutes. Turn the car off and check for leaks. They replaced it with a rubber oil pan drain plug and advised that the only real solution would be replacement of the oil pan to the tune of $650. Very costly, especially for a college student.
There was a small but steady leak with this rubber plug. He drove to the Wisconsin Dells. Fill Your Cart With Color Today! Have an assistant lift the oil pan with the floor jack while you provide support. Replace the gasket with a new one or apply a bead of sealant to the oil pan.
Once the pan is lifted to the proper location, tighten the bolts to secure the pan and remove the jack. Tighten the oil pan bolts to the specified torque level. Although you can always make sure that the gasket and the pan are intact, the possibility of it wearing out and getting damaged is still high and should be expected.
Step – Replace oil pan gasket. After the oil pan has been separated from the engine, the gasket can now be replaced. Clean all old gasket material from the engine block and oil pan mating surfaces. A scraper, razor blade, and acetone can come in handy to remove any stubborn material.
After allowing the oil to drain, place the drain plug back in. Now using the impact, with the 22mm deep socket and 18mm box wrench loosen the motor mounts. After this, on the driver’s side of the pan, there are nuts that hold clamps for your trany cooler lines and one for the positive cable to your starter.
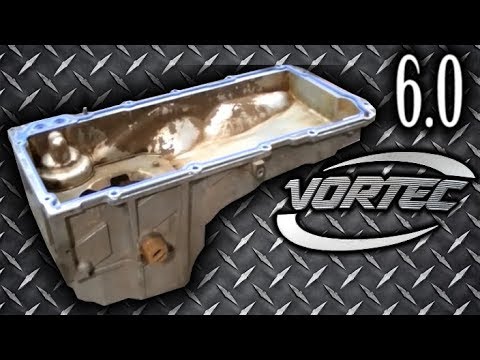
Made from durable 356-TAluminum this pan is a direct fit that will bolt in place of your factory lower pan with no special tools, grinding or cutting required. Clean the area around the oil pan and crankcase, then run your engine and recheck the area for a leak. If the engine is out of the vehicle, go to step 6. Raise the vehicle on the hoist to full height. I stopped by a local shop to get an estimate and the mechanic told me $4to replace the oil pan gasket and $7for the rear main seal. Oil was seeping from the bottom of the pan due to corrosion caused by winters.
It had actually been leaking for the past two years, which means we only got years out of it before rot poked holes in it.

We wanted to replace the pan instead of using a kit or material to “repair” it. Separate the oil pan from the engine. It will be necessary to move the oil pan from side to side to gain access to these fasteners.
No comments:
Post a Comment
Note: only a member of this blog may post a comment.